Hi Folks,
Continuing our rebuildable journey here is the next part in the DIY series: Installing and Wicking rebuildable coils. Enjoy 🙂
00:00
hey guys welcome back to mixology vape
00:02
last time we went a little bit over the
00:04
basics of some of the rdas
00:06
and rtas and today we’re just going to
00:08
be doing a basic build and whip tutorial
00:11
on the advocant twirl rda
00:14
so what we’re going to need for this
00:16
today is our coils
00:18
of course today we are using some
00:20
thunderhead creations
00:22
fused claptons you’re also going to need
00:24
a screwdriver
00:26
you’re going to need some scissors for
00:27
your wicks some elbow tweezers just to
00:30
make
00:30
combing out the wicks and fitting them
00:32
in the build deck a little bit easier
00:34
going to need some ceramic tweezers
00:36
and some wire snippers so we’ll start by
00:38
taking the top cap off the rda here
00:41
to reveal the deck now this twirl rda is
00:44
a very
00:44
very simple deck to build on whether
00:47
you’re building a single or a dual coil
00:49
and does have a nice deep juice well to
00:52
fit your wicks into
00:53
so with the screwdriver we’re just going
00:55
to gently
00:56
unscrew the screws that are in the posts
01:00
so i’m going to start by putting in one
01:02
of our coils
01:04
to where i want it to be now that’s
01:06
right about where the airflow is going
01:07
to come in
01:08
and so if you have it right near the
01:10
airflow it’ll have a lot more flavor
01:12
and it will be a much nicer vape i’m
01:14
then going to
01:16
just snip the legs over here just to
01:19
make a little easier to get the other
01:20
coils in as well as getting rid of any
01:22
little bits of metal that is hanging
01:23
around
01:24
now when i’m putting the second coil in
01:26
it can be a little bit easier
01:27
for me to pop a rod through the first
01:29
coil just to kind of keep it in place
01:31
now that way it’s just kind of sat there
01:33
and it’s not going to be moving around
01:34
and i can hold the rod to keep it there
01:37
but now i’m going to put in the second
01:38
coil
01:44
right to about the same spot
01:48
now that that’s in there i can clamp
01:50
these back down
01:53
while repositioning the coils slightly
01:55
there’s a little bit of trial and error
01:56
involved in this part so you just want
01:58
to position them right where you want
01:59
them
02:00
and then clamp them down there we have
02:03
it now that they’re tightly in there we
02:04
can then use this rod to just move them
02:06
around a little bit
02:07
get them into position
02:15
and now we’re going to go in again and
02:16
snip the legs of the second coil
02:23
so here we have the two coils in there
02:25
that clamp down
02:26
and now we’re going to read the homage
02:29
and they’re coming in at about a
02:30
.16 ohms for that dual coil build
02:33
now if you were running these at a
02:34
single coil build the resistance would
02:37
be double that
02:38
so basically if you’re doubling up on
02:39
your coils the resistance
02:41
is going to be cut in half so now that
02:43
we have our coils
02:45
into the posts and nicely positioned
02:47
we’re just going to take this atomizer
02:49
and pop it onto them onto a regulated
02:51
mod here so that we can
02:53
dry fire the coils and get them ready
02:55
for wicking
02:57
so we’re going to have this quite low
02:59
just about 20 watts or so
03:01
and it’s just a slow pulse just to kind
03:03
of clear off any residue
03:05
and then try to keep keep them burning
03:07
nicely
03:09
so now that we’ve got it at 20 watts we
03:10
can turn it up a little bit
03:13
and just pulse them out
03:18
i’m gonna turn it up to about 30 watts
03:20
now just to start getting a little bit
03:22
warmer
03:23
and we just want them to go a bright
03:24
orange we don’t want them to go
03:26
white and now with some ceramic tweezers
03:29
we can slowly strum
03:30
out any of the potential hot spots and
03:33
that will just keep your coil burning
03:34
nice and evenly
03:43
so now if we turn the wattage up a
03:44
little bit more and we
03:46
pulse these we’ll be able to see that it
03:47
will be burning from the center
03:50
which is what we want we want it to be a
03:52
nice nice burn from the
03:54
inside of the coil to the outside and
03:57
just a light orange
03:59
so now that that’s how that’s done we’ve
04:01
dried and strummed our coils
04:03
just going to let it cool down a little
04:04
bit so that we can pop our wicks in
04:06
there
04:06
so now what we’re going to do is take
04:08
our wicks so here we have some
04:10
organic cotton and we’re just going to
04:12
twist the ends a little bit to make it
04:14
easier to feed into
04:15
the coils now i like to twist the ends a
04:18
little bit and then
04:18
snip off the end of that just to get it
04:21
in there
04:25
now i can pull from the other side and
04:28
there we have our wicks in there
04:35
now that we have our wicks in place
04:38
we’re just going to cut to size so just
04:40
snip some of the wicks off the ends
04:42
those twisted ends that we’ve twisted up
04:45
and just get them looking nice and
04:47
straight now what we can do here is just
04:50
basically
04:50
fluff them out a little bit just so they
04:53
really wick the e juice nicely and you
04:56
won’t be getting any
04:57
burnt coils super fast now that they’re
05:00
fluffed out a little bit we’re just
05:01
going to slip them one tiny bit more so
05:03
that they fit nicely into the rda
05:05
and then we’re going to just grab the
05:07
coils the wicks sorry
05:08
and poke them straight in there
05:13
[Music]
05:21
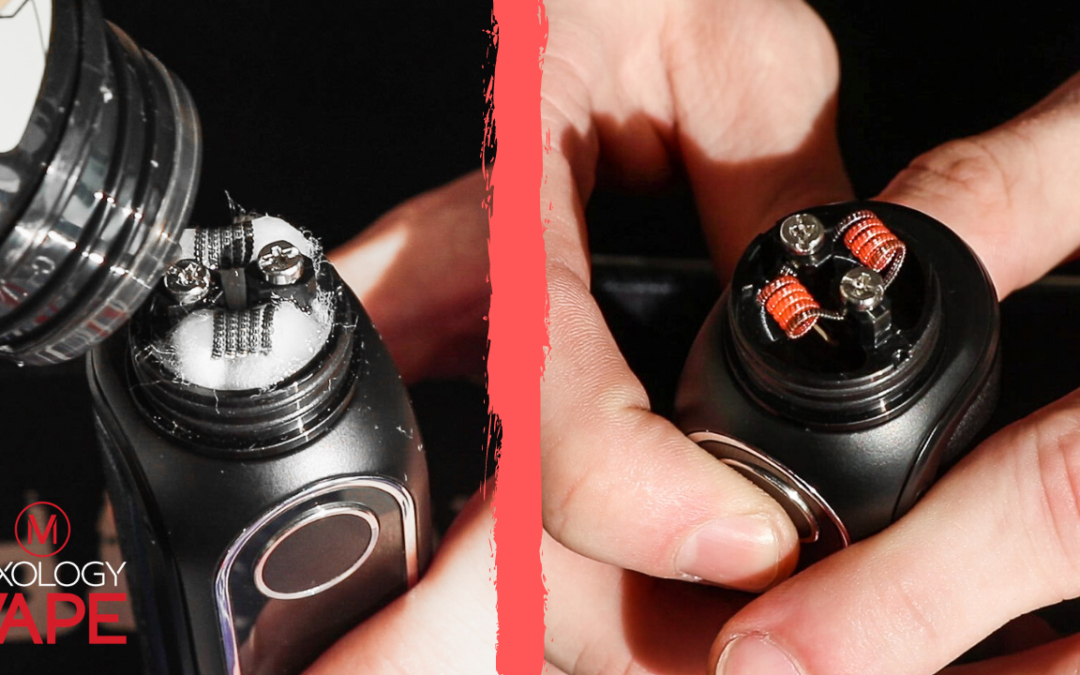
so here we have a whipped build on the
05:24
twirl rda
05:26
ready to juice up so now we’re ready to
05:29
juice up our wicks and ready to get
05:31
vaping so here we have
05:34
peach perfect by sensors which is a six
05:36
licks liquid
05:37
it is a peach and grape fruit
05:40
is delicious so all we’re gonna do is
05:43
just chuck some juice straight onto the
05:45
coils
05:51
and even some just down the sides into
05:52
the juice well
05:58
so now that we have a juiced up wicks
06:01
and the coils are ready to go
06:03
we can see how it goes when we fire it
06:05
so now that we have our build
06:07
with the coils assembled and installed
06:09
and wicked up and ready to go
06:11
we can fire it and we can see that it’s
06:13
got some lovely vapor coming off there
06:17
so all we need to do now is pop the top
06:19
cap back on
06:23
and there we have it
06:26
[Music]
06:28
okay guys so there we have just built
06:30
the twirl rda by advocate
06:33
i hope you’ve learned something today
06:34
and i hope that you’re ready to start
06:36
building
06:37
see in the next video guys